КАТЕГОРИИ:
АстрономияБиологияГеографияДругие языкиДругоеИнформатикаИсторияКультураЛитератураЛогикаМатематикаМедицинаМеханикаОбразованиеОхрана трудаПедагогикаПолитикаПравоПсихологияРиторикаСоциологияСпортСтроительствоТехнологияФизикаФилософияФинансыХимияЧерчениеЭкологияЭкономикаЭлектроника
Примеры использования в игре
Пример 1: В Windows, 1 Нажмите для исполнения «Двойного Нажмитеа» или «одного Нажмитеа»
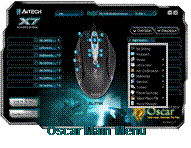
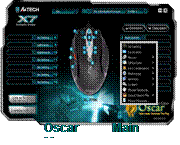 1: В Главном Меню Oscar выберете Макро Менеджер из опускающегося меню выбранной кнопки мыши, появится Меню Макро Менеджера. 1: В Главном Меню Oscar выберете Макро Менеджер из опускающегося меню выбранной кнопки мыши, появится Меню Макро Менеджера.
| 2:Нажмите “Нецикличный Макро” в “Меню Макро Менеджера”.
 >>выберете “Цикличный Макро” >> “Нажать, чтобы запустить, отпустить, чтобы остановить” (снизу) >>выберете “Цикличный Макро” >> “Нажать, чтобы запустить, отпустить, чтобы остановить” (снизу)
| |
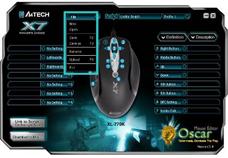
| 3: Отметьте «Автоматически увеличить задержку в нажатом положении» >>Выберете время ”мс” в “Модуле времени” | 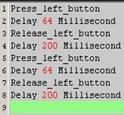 Fig. 1
| |
| 4:Введите ”64” в область “Время”. >>Нажмите “Левую кнопку” в “Области мыши”. | ||
| 5:Введите”200” в область “Время”. >> Нажмите “Левую кнопку” в “Области мыши”. >>Удалите "Нажать _Левую кнопку" и "Отпустить _ Левую кнопку ". | ||
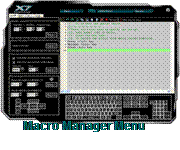
| 6: Повторите пункты 4, 5, теперь область редактирования будет выглядеть как показано на Рис.1 | ||
7:Нажмите иконку  для сохранения установок для сохранения установок
| ||
| Проверим действие функции в Windows: Когда «выбранная кнопка» удерживается в нажатом положении дольше обычного, она делает двойной Нажмите, что напрямую открывает файлы или запускает программы. Если же «выбранная кнопка» находится в нажатом положении меньше времени, то она функционирует как обычно, при этом не открывает, а выделяет папку. Преимущества: Пример демонстрирует возможность выбора действия кнопки (двойное нажатие или одинарное) пользователем «Цикличный Макро» в «Меню Макро Менеджера» позволяет регулировать время макро программирования, пример 1. Когда “Цикличный макро” активирован, доступны только две опции: A: "Нажать, чтобы запустить, отпустить, чтобы остановить": Если эта опция выбрана, макрокоманда будет выполняться непрерывно, в то время как клавиша нажата, и не остановится, пока та же самая клавиша не будет отпущена. B: "Нажать, чтобы запустить, повторно нажать, чтобы остановить": Если эта опция будет выбрана, макрокоманда будет выполнятся, в то время как клавиша нажата, , и не остановится, пока другая клавиша не будет нажата. | ||
Пример 2: В «шутерах»: погасить отдачу оружия при стрельбе, чтобы повысить точность
  Step 1: Из «Главного Меню Oscar» выберете Макро Менеджер из опускающегося меню выбранной кнопки мыши, появится Меню Макро Менеджера. Step 1: Из «Главного Меню Oscar» выберете Макро Менеджер из опускающегося меню выбранной кнопки мыши, появится Меню Макро Менеджера.
| |
| Step 2: Отметьте «Автоматически увеличить задержку в нажатом положении» и «Автоматически увеличить задержку при отпускании кнопки>>Выберете единицу времени ”мс” в поле “Единицы времени”. |  Fig. 2
|
| Step 3: :Введите ”64” в область “Время”. >>Нажмите “Левую кнопку” в “Области мыши”. | |
| Step 4: :Введите ”70” в область “Время”. >>Нажмите “Левую кнопку” в “Области мыши”. | |
| Step 5: :Введите ”85” в область “Время”. >>Нажмите “Левую кнопку” в “Области мыши”. | |
| Step 6: :Введите ”95” в область “Время”. >>Нажмите “Левую кнопку” в “Области мыши”. | |
| Step 7: теперь область редактирования будет выглядеть как показано на Рис.2 | |
| Step 8:Нажмите иконку для сохранения установок
| |
| Проверим функцию в игре: В реальных «шутерах» FPS, отдача оружия сопровождает каждый выстрел. При стрельбе очередью откат от отдачи оружия вырастает и не контролируется, в результате точки попадания будут вне ожидаемого диапазона. В этом случае, мы увеличиваем временной интервал между каждым выстрелом, тем самым уменьшаем отдачу оружия, и следовательно, точность стрельбы эффективно увеличивается. Как результат, подавлена отдача оружия, и кучность выстрелов высоко сконцентрирована. Или, если Вы уменьшите временной интервал между выстрелами, это повысит скорострельность, и у Вас будет больше поразить противников. Benefits:This example shows how to suppress gun’s recoil and increase shooting precision that users can decide how fast and how many bullets will be shot according to each various rifle or gun on the FPS games, the time interval of “64 ms” is the shortest testing value for the most of FPS games that can work in good order. As results, it offers better surviving opportunities over your opponents! |
Example 3: In the "First Person Shooter" game, 1 click to turn around 180 degrees
  Step 1: From the “Oscar Main Menu”, select “Macro Manager” from the “Task Pull-down Menu” of designated mouse button, then you'll see "Macro Manager Menu" pop up. Step 1: From the “Oscar Main Menu”, select “Macro Manager” from the “Task Pull-down Menu” of designated mouse button, then you'll see "Macro Manager Menu" pop up.
| |
| Step 2:Input ”799” of coordinate value in “Mouse Relative Coordinate X Axis Box”. >>Click “Plug In”. | 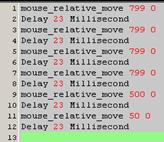 Fig.3 Fig.3
|
| Step 3:Select ”mSec” of time unit in the “Time unit” >> Input”23” of time value in “Time” box. >>Click “Plug In”. | |
| Step 4:Repeating three times from step 2 to step 3. | |
| Step 5:Input ”500” of coordinate value in “Mouse Relative Coordinate X Axis Box”. >>Click “Plug In”. | |
| Step 6:Click “Plug in” in “Time Control Area” of “Macro Manager Menu” | |
| Step 7:Input ”50” of coordinate value in “Mouse Relative Coordinate X Axis Box”. >>Click “Plug In” | |
| Step 8:Click “Plug in” in “Time Control Area” of “Macro Manager Menu” | |
| Step 9: Now your editing area will look like this as figure 3 shows. | |
| Step 10:Click the icon to save the setting.
| |
| Let’s check it in "First Person Shooter" game practically: In the real FPS shooting games, in the circumstances that your opponents unexpected turn to, or show up on your back, it will be almost impossible to instantly turn around and give them a shot. Or it requires a very high performance mouse to perform “turn around” actions, but usually it is not fast enough to accomplish the “turn around” action before your opponent starts to fire. This example demonstrates how powerful it is that it performs automatically the continuous “turn around” actions in the sudden, while your opponents are not ready to give you the fatal hits! Benefits:This example shows how to perform the “turn around” action by just one click to the designated button, and sustain your aiming point at the same level. The given “799” relative displacement value is due to, after in practical testing, the games only response to the value less than the maximum horizontal display resolution. For instance, this example is only applicable to the display resolution of 800x600 mode of your LCD display or monitor, “Overflow” error may occur in case the value is out of your display boundary. Meanwhile, the time interval is inserted between each action and the same action is repeated by 6 times, this is due to after practical testing, we found the FPS games will not properly response for the time interval shorter than 20 ms. |
Example 4: In "First Person Shooter" game, 1 click to suppress gun’s recoil by changing cursor relative displacement.
 Step 1: From the “Oscar Main Menu”, select “Macro Manager” from the Task Pull-down Menu” of designated mouse button, then you'll see "Macro Manager Menu" pop up. Step 1: From the “Oscar Main Menu”, select “Macro Manager” from the Task Pull-down Menu” of designated mouse button, then you'll see "Macro Manager Menu" pop up.
| |
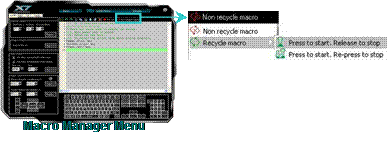
| Step 2: Click the “Non Recycle Macro” of the “Macro Manager Menu”. >>Select “Recycle macro”>>Select “Press to start, Release to stop”. |  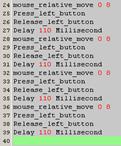 Fig.4
Fig.4
|
| Step 3:Tick the box of “Add delay automatically while release" >>Select ”mSec” of time unit in the “Time unit”. >>Input ”110” of time value in “Time” box. | |
| Step 4:Click “Left Button” on "Mouse Simulation Area". | |
| Step 5:Input ”3” of coordinate value in “Mouse Relative Coordinate Y Axis” box. >>Click “Plug In” | |
| Step 6: Repeating Step 4 | |
| Step 7:Input ”8” of coordinate value in “Mouse Relative Coordinate Y Axis” box. >>Click “Plug In”. | |
| Step 8:Repeating 7 times from step 6 to step 7. | |
| Step 9: Now your editing area will look like this as figure 4 shows.
Step 10:Click the icon to save the setting
| |
| Let’s check it in "First Person Shooter" game practically: This instance is similar to the example 2, but it offers faster shooting speed while perform the same effect of suppressing the gun’s recoil. For those FPS professional gamers, they are capable to perform precise and difficult “manual” actions of suppressing gun’s recoil during the consecutive shooting by moving the moue back and forth so as to keep the impact at the same point. Now, by using this instance, you can do the same expertise with one click to the designated mouse button. In the CS practical testing, we found this instance is very useful for the rifle types like” AK47 and M4A1”, but for those less recoil rifles such as MP5, you may reduce the relative displacement value. | |
| Benefits:This example shows how to integrate the “Mouse Relative Displacement” and “Recycle Macro” to perform the professional actions during the game play. This example demonstrates how to suppress the gun’s recoil by compensating the “Y relative displacement” value to reduce each shooting deviation, and hence increase the shooting precision. The Y relative displacement values are in the reducing order as in the practical game testing, we found the gun’s recoil is increased gradually with each bullet is short. And you may decide how many bullets will be shot by performing the “Recycle Macro” option; the consecutive shooting will be ceased while the designated mouse button is released. |
Example 5:In “CS” game, 1 Click to Buy All Weapons and Accessories
 Step 1: From the “Oscar Main Menu”, select “Macro Manager” from the Task Pull-down Menu” of designated mouse button, then you'll see " Macro Manager Menu" pop up. Step 1: From the “Oscar Main Menu”, select “Macro Manager” from the Task Pull-down Menu” of designated mouse button, then you'll see " Macro Manager Menu" pop up.
| |
| Step 2: Tick the box of “Add delay automatically while press “and “Add delay automatically while release”. >>Select ”mSec” of time unit in the “Time unit”. >>Input ”20” of time value in “Time” box. | 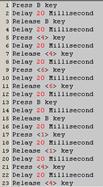  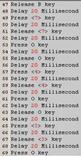   Fig. 5
|
| Step 3: Click "B 4 6 B 1 4 B 8 2 B 6 B 7 O 4 O 3 O 3 O 5 B 8 6" on "Keyboard Simulation Area”. | |
| Step 4: Now your editing area will look like this as figure 5 shows. | |
| Step 5: Click the icon to save the setting
| |
| Let’s check it in "First Person Shooter" game practically: By pressing on the designated mouse button, it will automatically perform all the consecutive actions either to buy all weapons and its accessories, such as “AWP, KEVLAR+HELMET, HE GRENADE, FLASH, DEFUSAL KIT, DESERTEAGLE, SMOKE GRENADE, BUY PRIMARY AMMO, BUY SECONDARY AMMO” or quick assignment of the team tasks. In the FPS games like CS (Counter Strike), while the game is re-started, it is crucial to buy all the equipments and assign the team tasks as soon as possible, so that you can take advantage of time and position to combat with your opponents. Benefits: This example demonstrates the powerful “Keyboard Macro Commands”. With one click on the designated mouse button, all the weapons and its accessories are consecutively and purchased, and the team tasks are assigned automatically. This functionality can also be applied to those popular Windows applications such as “Photoshop and Word” to improve the office efficiency. |
Example 6: Quick perform settings in the “PROE2001”
This example requires initial setup in the three parts, respectively they are computer settings, PROE software settings and Oscar mouse editor software settings.
| Step 1: Computer Settings Open "My Computer", on the hard drive D create a new folder "D:\WORK" >>Press "Right Button" of the mouse on "PROE" shortcuts icon >> select "Properties" | |
| Step 2: PROE Software Settings: Open "PROE" software; create a new file under the path that you appointed. Then enter "PROE". Click "Function-- Mapkeys--New--Input the name "D" -- Record -- Feature -- Create-----Surface-------Advanced------Boundaries------Done------Done------Stop-----Confirm-----Save(The system will produce a config.pro file automatically)------OK. A shortcut is established and you can duplicate the same process to organize as many shortcuts as you like in the “PROE”. | |
Step 3: Oscar Mouse Editor Software Settins
A: Open "Oscar Mouse Editor Software", Please follow the steps:
Just double-Click on the “Oscar Editor” icon“  ”on the desktop.
ORGo to START >> PROGRAM >> Select Oscar Editor. Now the Oscar “Main Menu” will pop up as shown on the right. ”on the desktop.
ORGo to START >> PROGRAM >> Select Oscar Editor. Now the Oscar “Main Menu” will pop up as shown on the right.
| |
B:From the “Oscar Main Menu”, click the “File”, you’ll see the “Pull-down Menu”.
 >>Select “New”>> "rename" >>Select “New”>> "rename"
| C:Input the "PROE2001" as script file name >>Select a function key option (for instance the 4thButton) >>Select “Keyboard” from “Task Pull-down Menu”, then you’ll see the below image. >>Click "D" key on below keyboard image. >>Click "File" from “Oscar Main Menu” >>Click “Save as” to save settings>> Click the “Download to Mouse” to store script file to mouse on-board memory.
|
| After you have finished above settings, a “specific-PROE-purposed” mouse is ready to serve. For instance, to accomplish a PROE solid surface may require 7 steps and now with one click on the designated 4th button of the mouse, all the tasks are accomplished automatically and it saves all the processes usually require lots of efforts and time. |
Example 7:Press the “designated button” and synchronously move the mouse towards “  ,
,  ,
,  and
and  ” to directly perform “Zoom In, Zoom Out, “I E and E-mail”.
Step 1: Double click on the “Oscar Editor” icon“ ”on the desktop. OR,go to START >> PROGRAM >> Select Oscar Editor. Now the Oscar “Main Menu” will pop up as shown below.
.
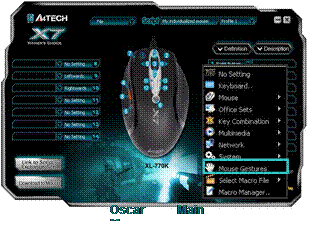 Step 2:Select “Mouse Gestures” from the “Task Pull-down Menu” of any mouse button, then you'll see "Mouse Gestures Menu" pop up (shown as right figure).
| Step 3:From the “Mouse Gesture Menu”, click any of “directional option”, then you’ll see “Direction Pull-down Menu” pop up and many functions are available for option.
 Mouse Gestures Menu
| |
Step 4:Select “  , ,  , ,  or or  ” arrows and select “Zoom In, Zoom Out” from the “Office Sets” option, and “I E” and “E-mail” from the Network” option from the “Direction Pull-down Menu” in the sequential order respectively.
Step 5: Click “OK” in “Mouse Gesture Menu”. >> Click “Download to Mouse” to finish settings.
Step 6:Press the “Designated Button” on the mouse and synchronously move the mouse towards “ ” arrows and select “Zoom In, Zoom Out” from the “Office Sets” option, and “I E” and “E-mail” from the Network” option from the “Direction Pull-down Menu” in the sequential order respectively.
Step 5: Click “OK” in “Mouse Gesture Menu”. >> Click “Download to Mouse” to finish settings.
Step 6:Press the “Designated Button” on the mouse and synchronously move the mouse towards “  , , , ,  and and  ” directions to perform “Zoom In and Zoom Out”, or directly open the “I E and E-mail”. ” directions to perform “Zoom In and Zoom Out”, or directly open the “I E and E-mail”.
| ||
Let’s check it in “ACDSee”
Open your picture with ACDSee software, press the “Designated Button” on the mouse and synchronously move the mouse towards  direction, the picture will be zoomed in directly. OR,press the “Designated Button” on the mouse and synchronously move the mouse towards direction, the picture will be zoomed in directly. OR,press the “Designated Button” on the mouse and synchronously move the mouse towards  direction, the picture will be zoomed out directly as shown below.
Original Size Zoom Out Zoom In direction, the picture will be zoomed out directly as shown below.
Original Size Zoom Out Zoom In 
| ||
Let’s check it in “Outlook and I E”
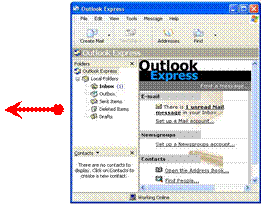 Press the “Designated Button” on the mouse and synchronously move the mouse towards Press the “Designated Button” on the mouse and synchronously move the mouse towards  , then it will open the “Outlook Express” directly. , then it will open the “Outlook Express” directly.
| ORpress the “Designated Button” on the mouse and synchronously move the mouse towards  , this will open “I E” directly. , this will open “I E” directly.
| |
| Benefits:These examples show how to integrate the “Mouse Gestures”, when the “Designated Button” is pressed and move your mouse in 16 different directions, you may perform instant functions such as “Zoom In, Zoom Out, Previous Page, Next Page”, up to 16 functions. It is user-friendly and unprecedented handy tools to use. | ||
Дата добавления: 2014-12-23; просмотров: 848; Мы поможем в написании вашей работы!; Нарушение авторских прав |